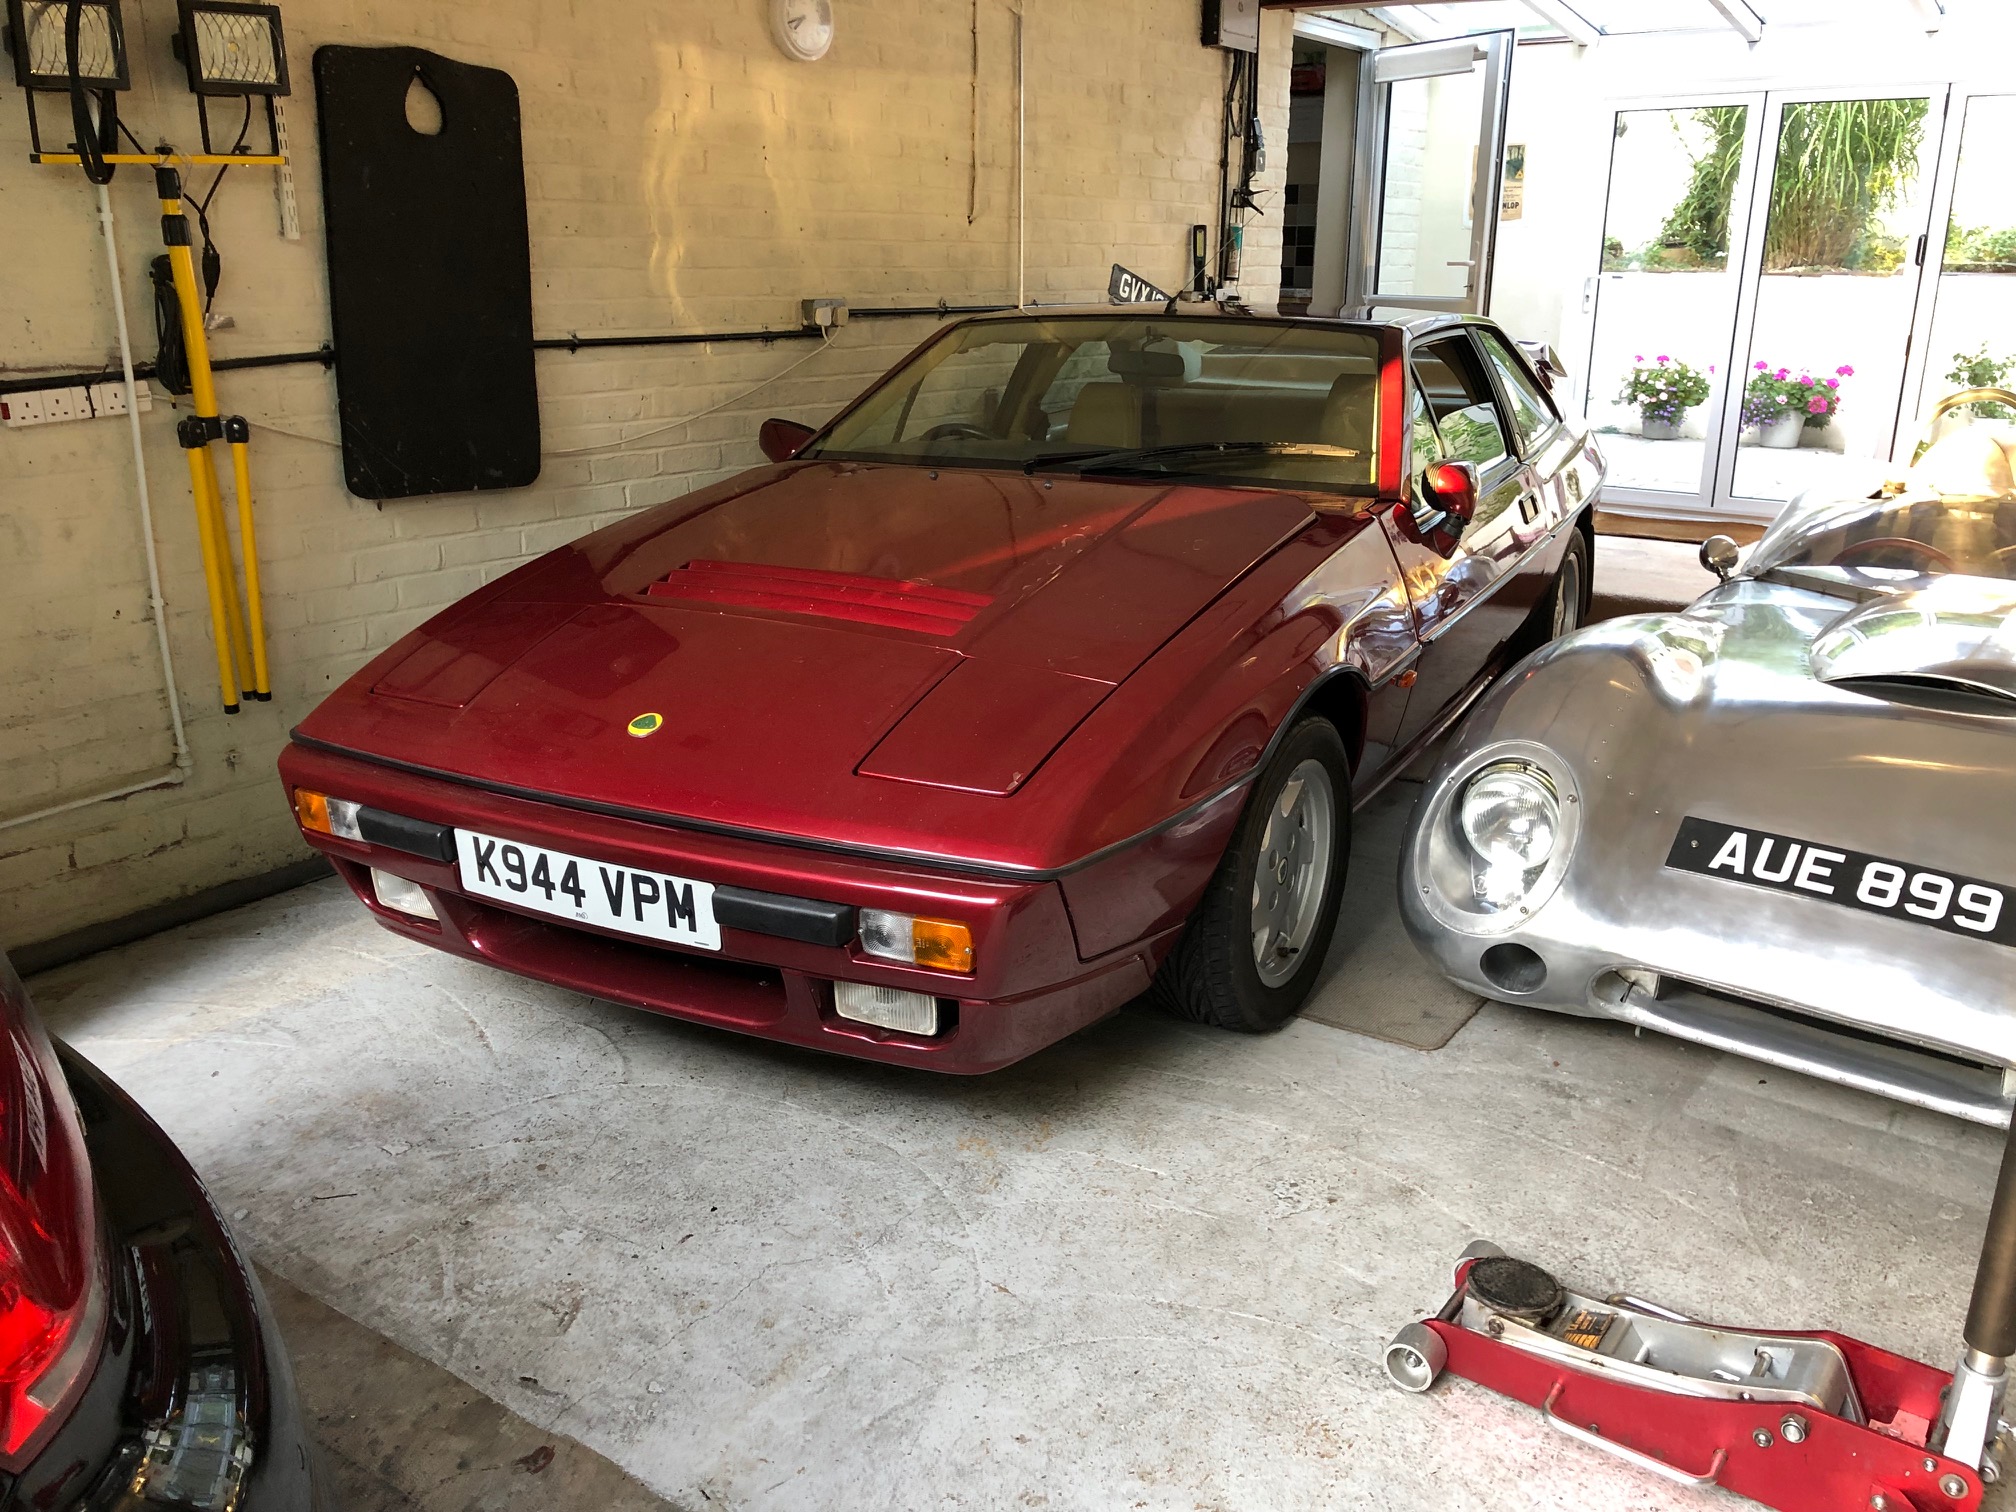
1992 Lotus Excel SE purchased to potentially use as a daily driver. With the cars built with a galvanised chassis, Toyota running gear and Lotus 2.2 twin cam engine what could go wrong!
Picked up the car on the 9th August, With the car back home a complete assessment of engine/suspension, brakes, drivetrain and electrics will be performed.
First job was to clean the front suspension and check the shock absorbers as the front end is feeling pretty loose over bumps. All bushes look ok so either ball joints or shocks are the issue. As the shocks are adjustable have wound them up 5clicks, front end feels much stiffer now.
Engine bay was cleaned and all corrosion moved from the connectors. New plug leads and distributor cap ordered. Coolant system flushed and filled with new antifreeze.
So work to do:
Fit new distributor cap and leads – done
Compression test
Check and clean all grounding points -done
Check rear suspension and brakes
Check front suspension and brakes
Door bars (to be replaced)
Fuel system to be cleaned and filter replaced – done
Tune Carburettors (using four port manometer) -done
Fit radiator fan override switch – done
Check aircon system for leaks and recharge- checked and refilled by Esprit Engineering
Fix exhaust leak at the flexible joint – new downpipe fitted by Esprit Engineering
Fit sunroof
Front suspension
N/S now completely stripped. The shock absorbers have failed as the piston can be moved easily at any damp rate setting. The lower arm inner wishbone bush has lost its bonding to its outer sleeve allowing fore and aft movement, this means that the caster is moving and bump steer will be evident! Removing the outer sleeve is causing me some grief – patience is required to complete this task!
Lower arm wishbone outer sleeve now removed, which took a few hours. New parts have now arrived from SJ Sportscars so the n/s front suspension rebuild can proceed.
First task will be to fit the new upper and lower wishbone bushes.
N/S front suspension rebuild complete with 9mm spacer fitted to the front of the anti-roll bar, no spacers previously. New steering rack gaiters to be fitted as the inner lower wishbone bolt just fowls the gaiter when the bolt is fed through the mounting stud. One issue with the protech shocks is the location of the adjustment knob as the access is through the spring coils. The n/s is currently set to 4 clicks. New springs are as original and fit into the lower spring platform. The upper spring mount has been changed from steel to polyurethane.
The wheel arch has been painted with underseal with the chassis cleaned and rust protection sprayed where needed, chassis galvanising is in good condition.
Removed inner bush lower wishbone arm. New outer ball joint and bush fitted by a local garage, the outer ball joint was severely worn.
Removed the front o/s brake caliper, which is very corroded and have decided to purchase reconditioned units.
Front suspension and brakes now rebuilt using the existing discs and pads.
Work now progressing on the n/s rear suspension and brakes. N/S spring and shock absorber, pads, disc and brake shoes all removed. The brake backplate was cleaned and two coats of hammerite used for protection. The driveshafts and hub bearing slook in reasonable condition with no significant noise from the bearings. The brake caliper was cleaned, stripped. All seals removed and checked for wear. The piston was polished lubricated and refitted into the caliper bore. The caliper was then sprayed with a high temperature paint. Brakes shoes were checked for thickness, cleaned and fitted to the backplate. The hold-down springs can be assembled then fit the shoes by sliding them onto and under each hold-down washer. Ride height of the existing spring platform to be measured to ensure that the new assembly is the correct height.
Started work on the n/s door so removed the outer trim and access panels. The door bar although rusty is only surface corrosion. All the flaky paintwork on this steel bar was rubbed down and the bar was sprayed with Dynax S50 corrosion protection spray. The window frame was also sprayed.
Passenger window speed is poor and as the n/s window is driven by relays there should be plenty of volts across the motor; something to be checked. Relays are fitted to the n/s footwell and are driven directly from the Auxiliary Relay powered from the battery bus. Two relays are used, which power the motor up or down with a return path to ground. Need to check there is a decent ground connection for the motor.
Whilst waiting for the rear suspension components changing the diff oil will be tackled. As the drain plug is rusted in place the oil will be pumped out of the filler plug. New plug fitted later. Oil pumped out and fresh oil into the diff. Dynax S50 sprayed onto the Diff support frame. Lotus galvanised the chassis but not the support frame!
Have also replaced the n/s rear seatbelt mounting frame, which is located in the rear wheel arch and showed signs of significant corrosion. A new stainless part now fitted.
N/s rear brakes and suspension now complete with the car back on four wheels. (single turn on the rear shock).
Measured the front and rear toe-in using a couple of laser levels to create a ‘square’ around the car. Rear toe approx 3mm on each side. Front toe-in adjusted for 1-2 mm each side.
Next task will be rebuilding the o/s rear suspension and brakes then removing the o/s door trim to check condition of the window runners and door frame.
N/s rear wheel removed and the chassis suspension components cleaned with a wire brush. First task will be removal of the brake components for repair/overhaul. including a new braided brake hose.
O/s rear suspension work almost complete, new spring and shock absorbers( set for 2 clicks), overhauled the brake caliper and cleaned the piston and seals. Replaced the brake disc, painted the brake shoe backplate.
Top link rear suspension bushes ordered, which will be fitted when received.
The drivers door panel was removed and the door bar rust proofed as surface corrosion. Every moving part was greased but still have an issue with the door lift mechanism as the window vibrates moving up or down. The door motor will be removed and the mechanism checked for free movement.
Removed the passenger door panel and door frame. Some of the bolts were seized in the door frame, however plenty of WD40 and managed to ease them out. Removed the frame painted and fitted a new glide. Removed 100mm of the rear edge as the frame was bent and beyond repair. With the frame removed there was good access to the door beam, which was cleaned and fully rustproofed. The door frame was reinstated with black silicone used to seal the frame when refitted. Dynamat fitted to improve soundproofing.
Back to the rear brakes. Removed the n/s rear caliper and fitted new seals slide pin and rubbers. Rear brakes complete then bled the system.
Fitted a new petrol tank vent pipe using silcone piping.
Started the car and turned it around for easier access to the clutch master and slave cylinder. Still air in the brakes so bled the system again.
Gearbox oil change – removing the filler plug failed as the flats on the plug were rounded and couldn’t get any grip on the plug. Removed the reversing light switch, which is just above the filler plug and could be removed with ease. Drain plug was removed and filled with 2.5 litres of GL4.
With the n/s of the car raised on axle stands the slave cylinder was removed, which when inspected was in a very poor state and will need to be replaced. Now for the master cylinder. The drivers seat unbolted, underdash trim removed then managed to get underneath the steering wheel to get access to the pedal box. The relay assembly was unbolted as it was impossible to see around it. Took a few hours to extract the master cylinder, which was in the same state as the slave cylinder New master and slave cylinders now fitted, system bled.
Central Locking – not working so need to investigate. Removed the passenger door panel and checked operation of the door lock. The lock was not fully engaged when set so not enough travel to allow the locking motor to recognise a change of state. Door latch removal was the only option, which requires the control rods to be removed. The two long rods to the interior door handle were tricky with the door lock rod pivot pin held by a P clip. To access the clip a hole was drilled in the door panel. The exterior door handle control rods were removed at the clips by removing the circlips.
The door latch was inspected on the bench, the assembly was cleaned and the loose central rivet drilled out and replaced with an M4 setscrew and nyloc nut. A . 10mm hole was drilled in the alloy spacer plate to ensure the plate sits flush on the latch when the assembly was refitted. After cleaning and regreasing the latch now works as the backplate is now held firm by the M4 setscrew.
Removed passenger door panel and found the central locking control rod disconnected from the motor. Once refitted central locking is now operating on both doors.
There is a purge pump which is designed to withdraw the hot air from the airbox to help with hot starting. The pump was seized so the nylon assembly was cut apart, the motor ran freely with the impellor removed so looks like the impellor is jamming. The assembly was rebuilt with a slight gap between the two halves to ensure there is free movement. Fitted back into the car to be checked when the car is up to temp and the ignition is off.
Carburettor Tuning
Ok another go at tuning the carbs – set up the four port manometer with all idle air bleed screw closed and idle mixtures at 4 turns out. With a warm engine any slow increase in throttle speed causes a stumble, which suggests a weak mixture. Balanced the carbs and adjusted for max airflow through each barrel with the manometer. Still the stumble occurs so fitted the AFR meter to the exhaust. At 1000rpm the mixture is weak and gets weaker with an increase in rpm. The idle air bleed jets were swapped for richer metering and the process repeated. Now able to achieve 12-13:1 at idle with reduced stumble but still 6 turns out to achieve 12:1. Ordered richer idle jets and the carbs will be retuned.
Retuned the carbs and took the car for a 5 mile run with the AFR probe fitted to the exhaust. No throttle position sensor, just rpm and AFR data logged. Results were promising and showed AFR figures between 12-14 over the 1500-4000rpm rev range.
Jan 2020
First run to work, which is a 90 mile round trip. The car has excellent handling properties with compliant suspension and good grip in the corners. Only issue notice is exhaust/engine noise under load. Checked for exhaust leaks and none found.
|
Fitted a 123Ignition mappable distributor, which allows tweaking of the centrifugal and vacuum advance curves through a bluetooth connection and a phone app. Smoother power delivery with the electronic control. Have dialled in 32deg max advance with no evidence of pinking so may be able to add more.
The fuel gauge is very erratic as there is no damping on the sender. Managed to find a supplier of a microcontroller board, which drives the existing VDO gauge. The microcontroller can be programmed for calibration values, provides an adjustable damping value for the sender and a switched output to drive the low fuel level light. Yet to check the low fuel level output but hopefully it works.
Jan 2020
First long run in the car to work (45 miles return trip). Car handling was excellent but brakes need more feel, hopefully the new pads will bed in. The exhaust is routed over the rear wishbones and there is little clearance and is fouling the wishbone when the suspension is loaded – adjustment required.
Cam Belt
As quotes from several garages were expensive, decided to do the work. Ordered a new belt, tensioner pulley, cam pulleys and auxiliary pulley. Remove the plugs, water hoses, airbox and set the cams to TDC. Then used white nail varnish to mark the belt position on the cam pulleys, auxiliary and crank pulleys. Ty-wrapped the belt to the cam and auxiliary pulleys then loosened the manual tensioner. Removed the inlet cam pulley by slowly sliding the pulley of the belt. Marked up the new pulley with the same location marks then fitted the new pulley onto the old belt. This process was repeated for the exhaust and auxiliary pulleys before the ‘old’ belt was removed. The new cambelt was painted with the same registration marks and then fitted. A bit fiddly to get the belt on all pulleys, good news is that all marks on the pulleys and belt matched?
Timing belt tension was adjusted for a maximum of 90deg twist on the longest run, which seems to be the recognised tension in all the forums.
Took the car for a short run to check the new belt and temperatures pressures. the battery is not charging and the belt is whining above 3000rpm so perhaps too tight. With the car back in the garage found a loose lead from the battery to alternator. As for the timing belt, perhaps a little too tight; LotusBits suggested it may be a too tight and you should be able to twist the belt by 90deg with finger pressure. This adjustment will sorted the issue.
Chassis Alignment
This was checked by Downton Tyres and the toe-in was adjusted. Front caster and camber were within limits, however the rear toe-in was about 1.5mm out on each side. There is no easy method to adjust the rear and apparently most Excels that left the factory were out of limits so probably have to live with the error. Geoff at Esprit Engineering inspected the rear bushes and advised all in good condition.
Clutch
When the car is at full throttle and above 4000 rpm the clutch is slipping. It may be incorrect adjustment of the slave cylinder or a worn clutch. The driven plate was replaced about 5000 miles ago so there should be plenty of wear. Further investigation has confirmed that the clutch needs replacing so looks like a trip to Lotusbits to get this done.
The air conditioning . worked for a few weeks then the low pressure sensor and the system switched. Returned the car to Esprit Engineering who used their vacuum pump to check for leaks. The test showed a slow leak, which suggested a connector drawing in air. As this is a 1992 car the aircon uses the later hoses with ‘O’ ring seals. The compressor hoses were cracked open and found that both hoses were fitted with the wrong seals. Both ‘O’ rigs were replaced with the correct ‘green’ versions then the system was pressurised; aircon now works and will now be run regularly to maintain lubrication.
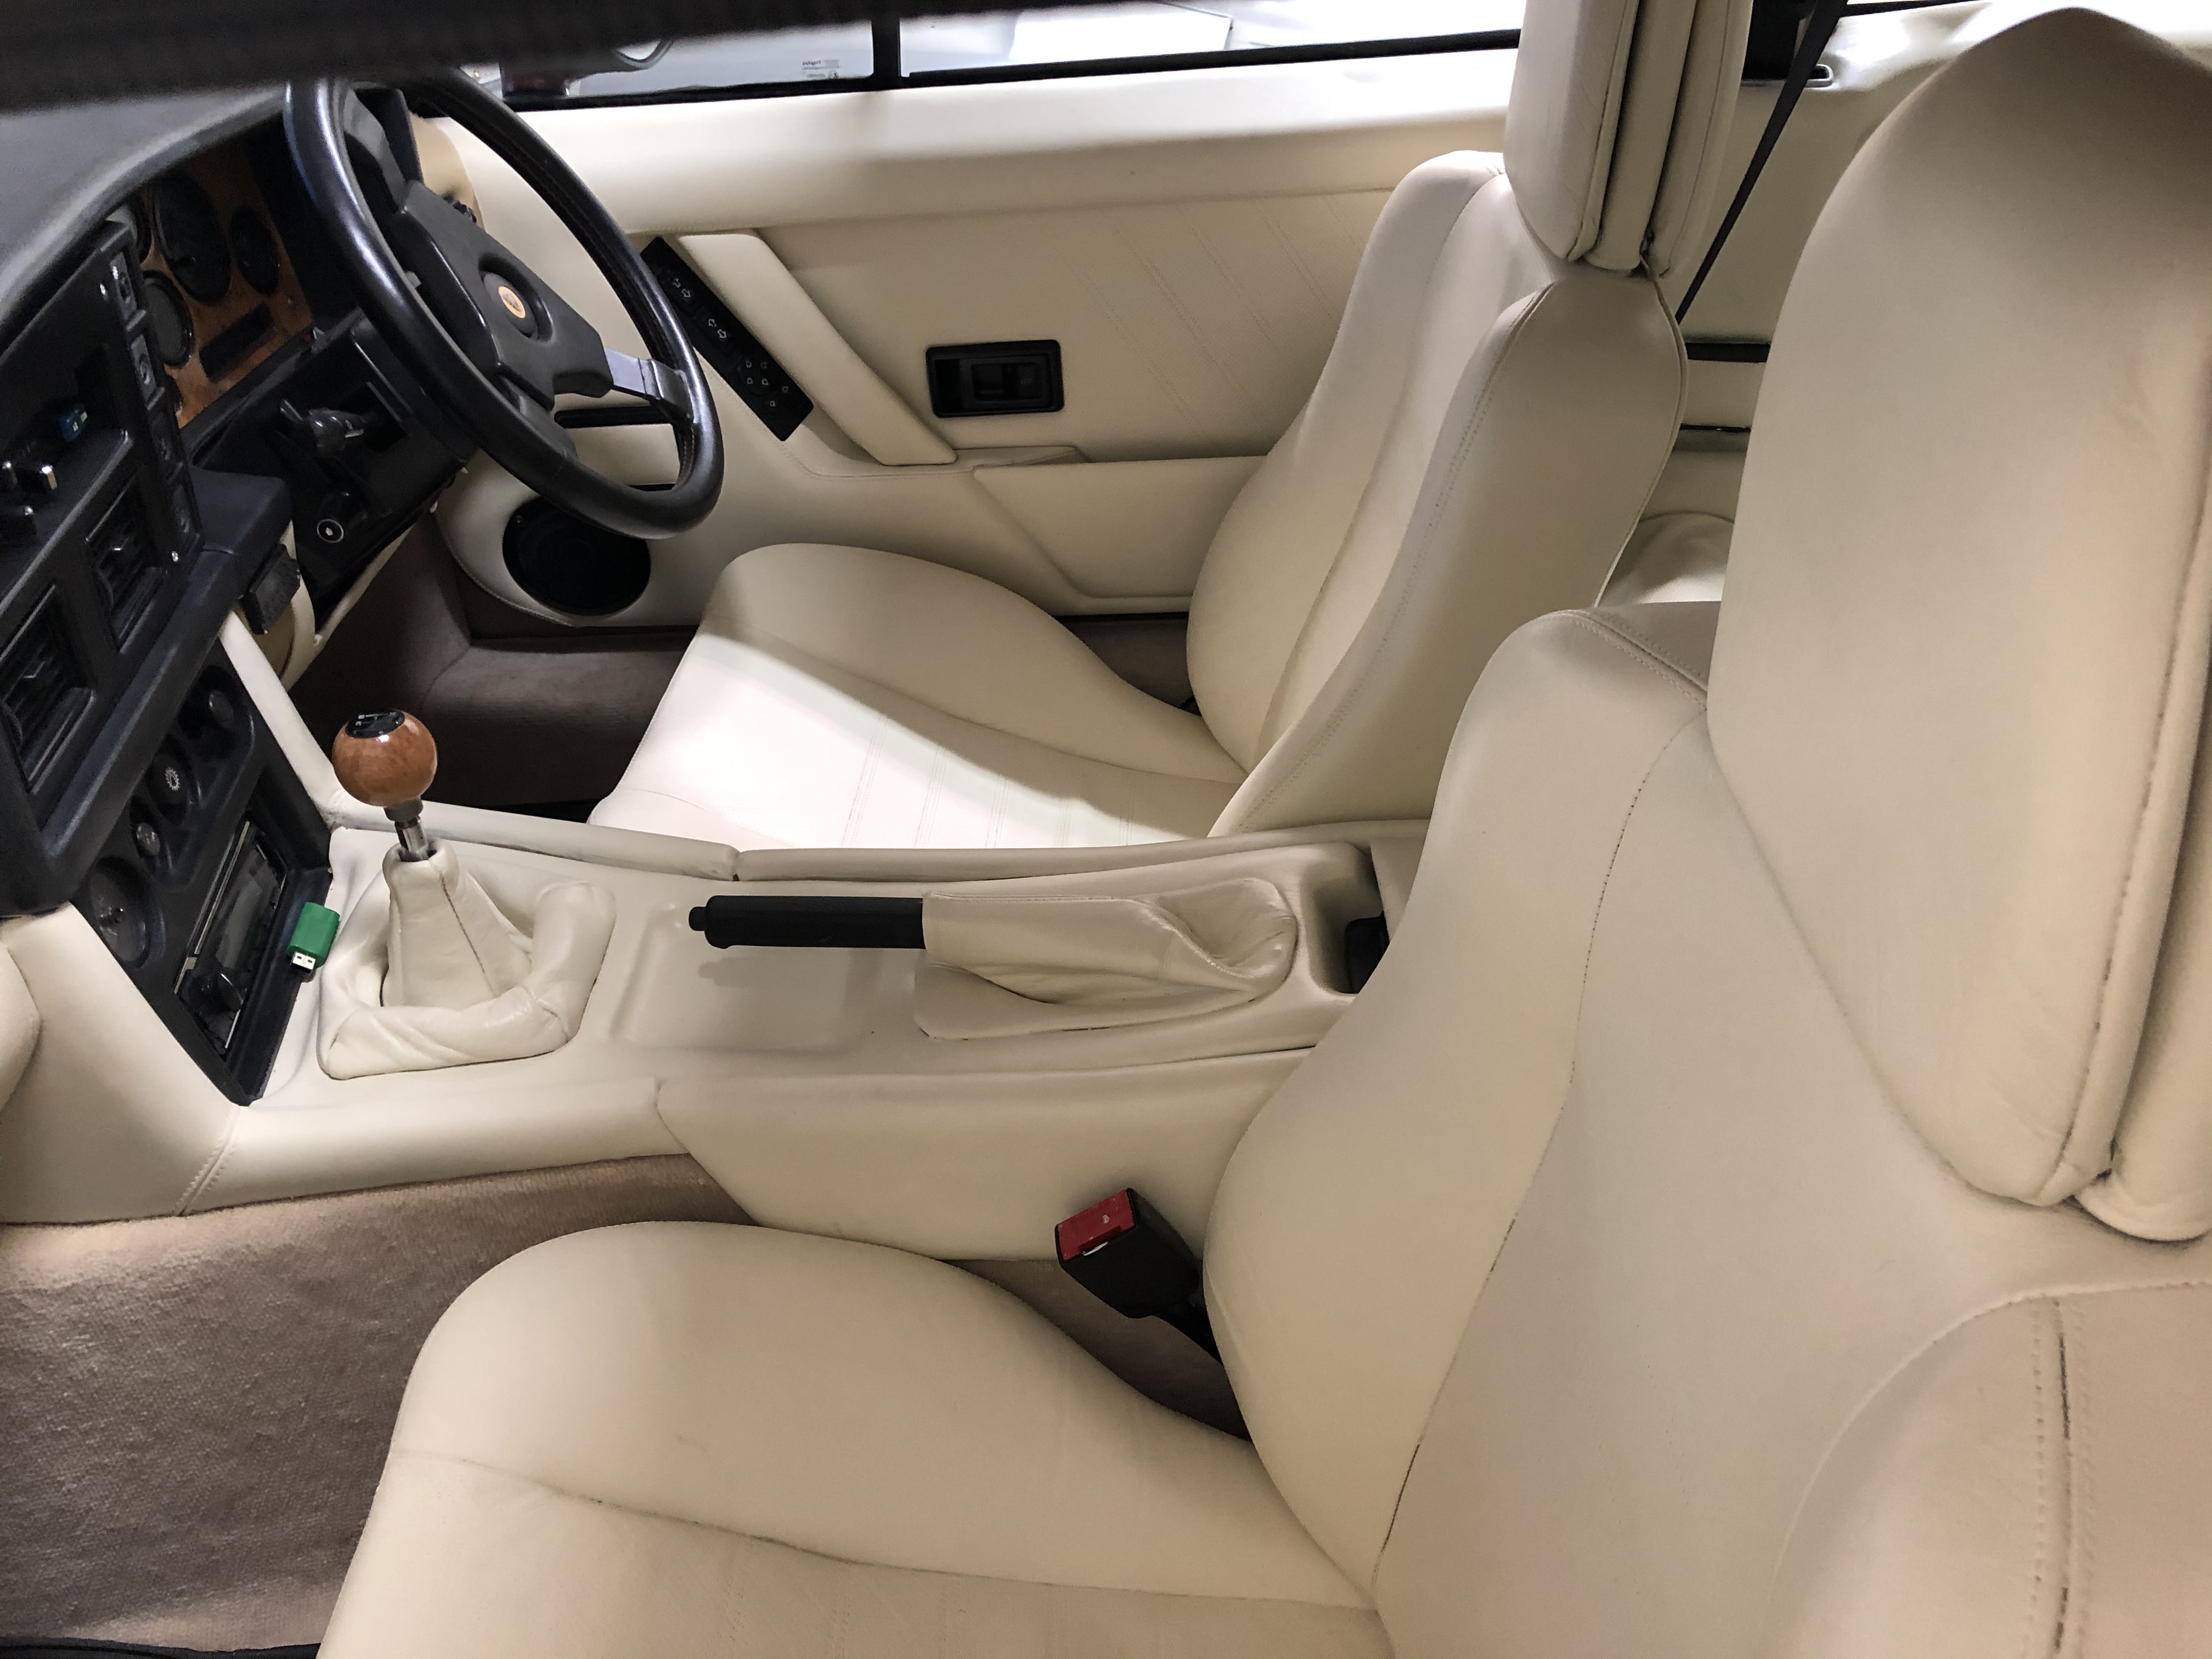
Car interior
The leather seats and trim are a sort of mustard colour, very 80s but looking pretty worn and drab. Some PU leather colourant was purchased in cream (CR12) , which is a water based paint. The passenger leather seat was removed, cleaned with an alcohol degreaser and then the paint applied sparingly with a sponge. A heat gun on low setting was used to dry the paint. It took 4 sponge applied coats before the original colour was covered. A final coat was applied with a cheap spray gun bought from a hardware outlet and designed for masonry painting. The spray gun worked a treat and gave a smooth even finish. MOst of the interior completed, the colourant was protected by a leather sealant, which was sprayed on to the seats. The wear properties of the colourant will be assessed over time. Photos show before and after the dye was applied.

July 2020 – The car is now sold as another project has been purchased (MGBGT!)
